• New Horizons on Maelstrom
    Maelstrom New Horizons


    Visit our website www.piratehorizons.com to quickly find download links for the newest versions of our New Horizons mods Beyond New Horizons and Maelstrom New Horizons!

Guide Parts of a Ship

Post Captain

Seamanship Advisor
Coordinator
QC Advisor
Storm Modder
I would like to thank the Mighty Powers that Be for stickying this thread.

The Purpose of this thread will be to help the modelers with a ship's anatomy, most notably in the rigging. This will allow the modelers and anyone willing to give advice express their ideas more clearly, and in proper seamanlike terms.
(I have run into the problem of people not knowing what I'm talking about when I'm attempting to explain some of the more confusing aspects of rigging.)
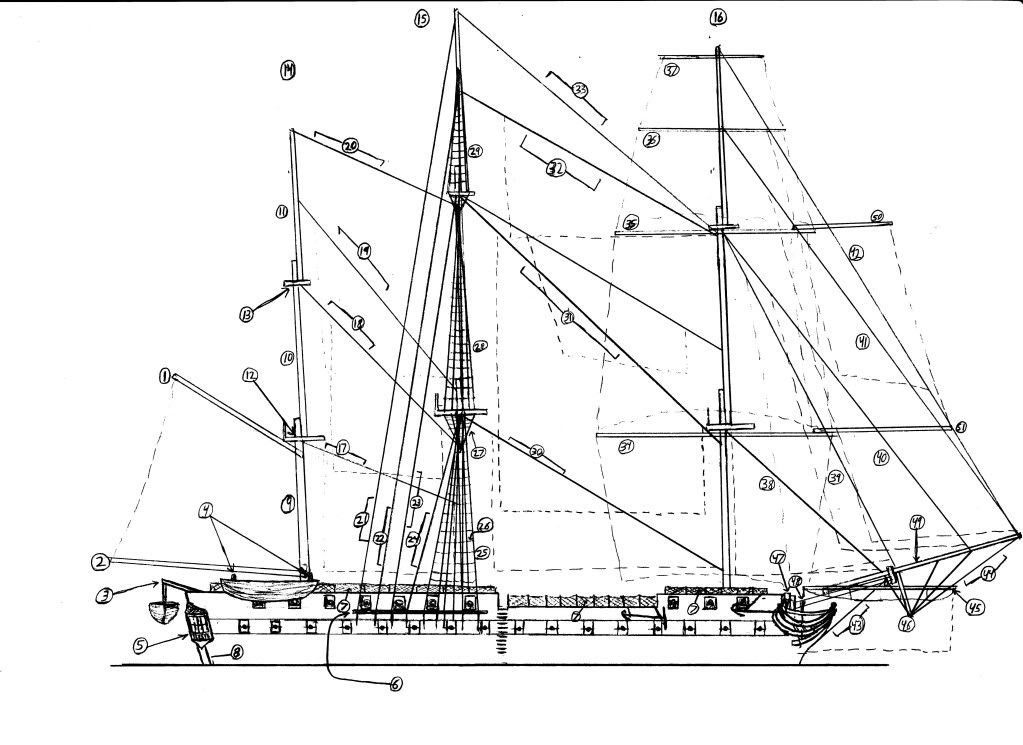
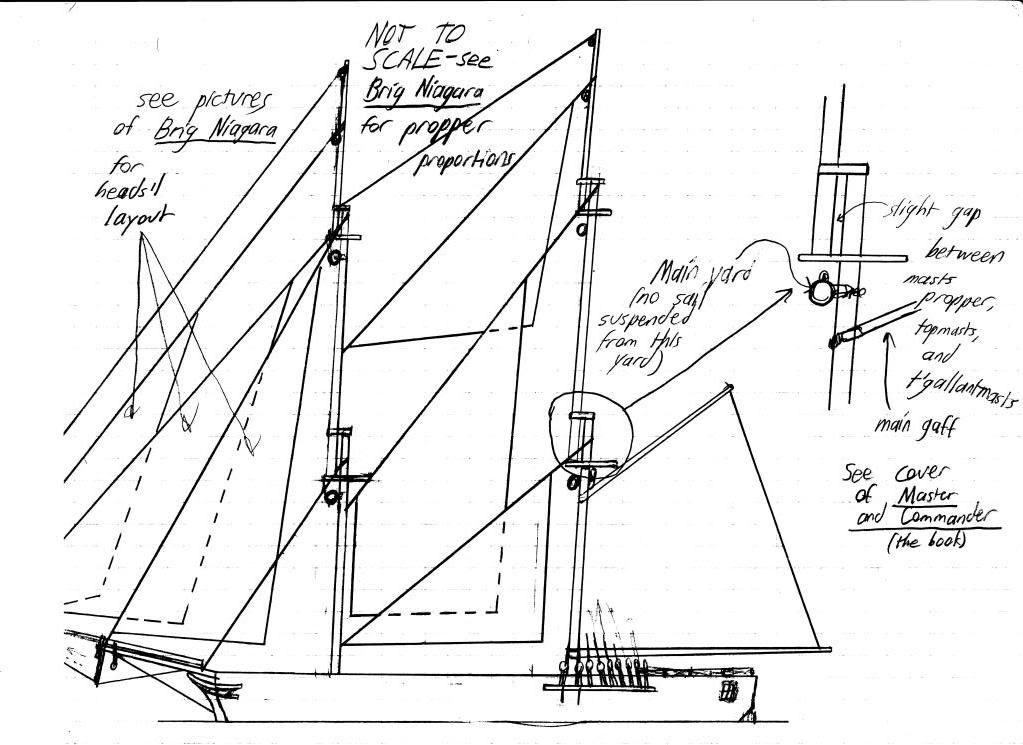
Over the course of several days, I will post any material I have (such as diagrams I have drawn) to assist forum members in understanding rigging, seamanship, and ship's anatomy.
My qualifications: I am a topman aboard the Brig Pilgrim, and I have served as a yard captain (controlling furling and setting of sails) on every yard on the mainmast multiple times. I have shot several videos from aloft at sea, one of which is uploaded to Youtube.

Right now I have diagrams I made of sails, masts, and other rigging that I will attempt to scan and post. I already have corresponding descriptions for two of the diagrams, so expect more soon.


Contents:

Post #2: Important rigging
Post #3: Trapezoidal sails
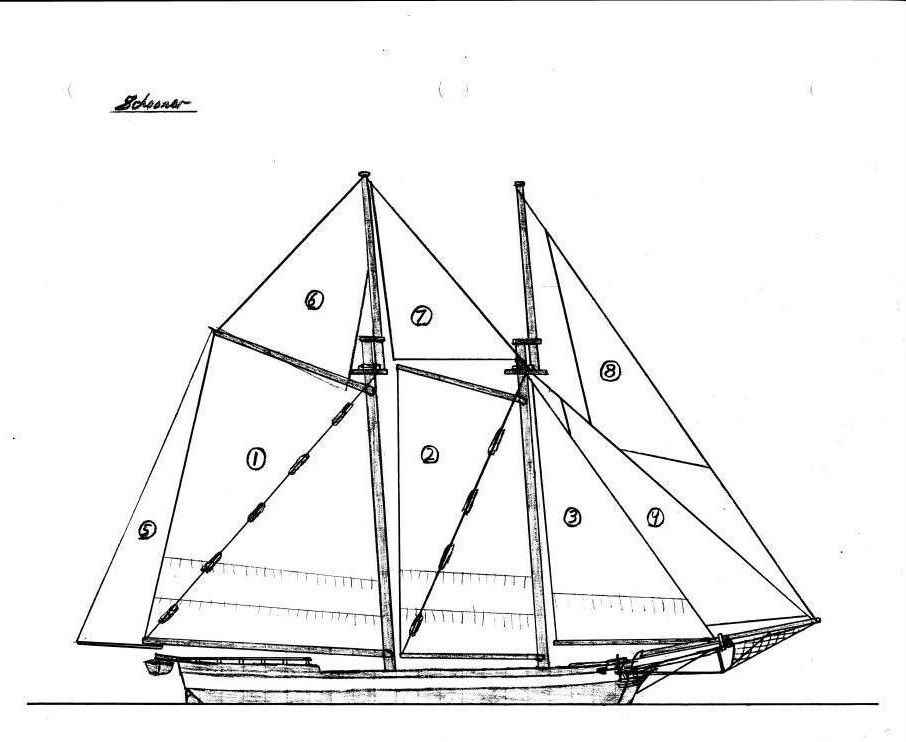
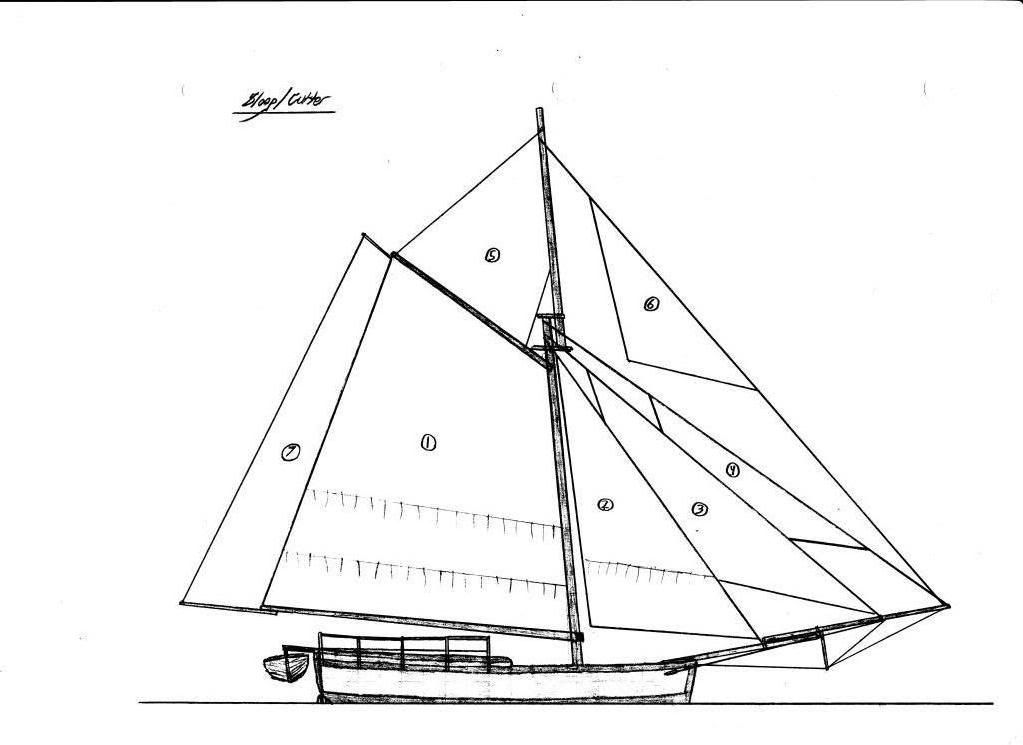
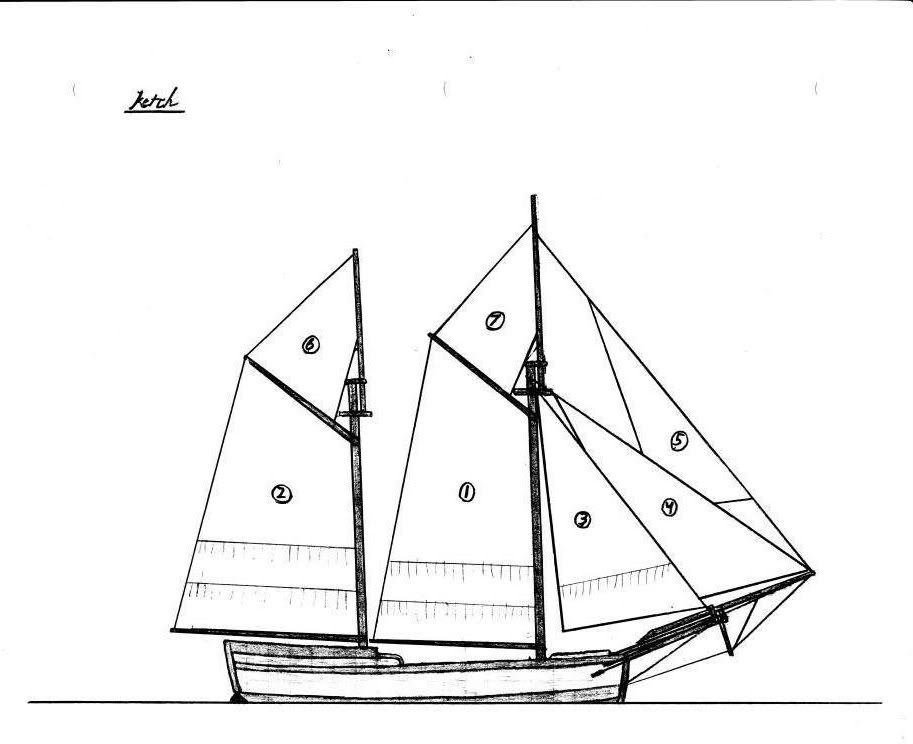
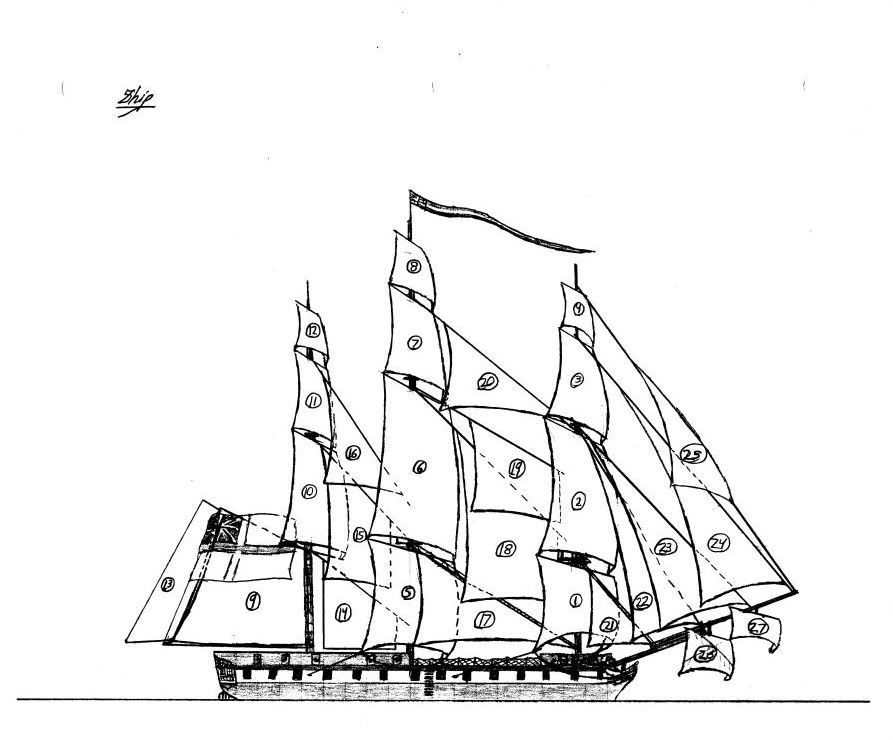
Post #4: Sail Plans (I can take requests for any European vessel. The plans will take about a day to produce then scan during the week, weekend waiting times may be as little as an hour. I have a snow brig ready, which only needs to be scanned.)
...............1: Schooner
...............2. Sloop/Cutter
...............3. Ketch
...............4. Full Rigged Ship
Post #5: Lines on the Different Pieces of Rigging (under construction)
Posts #13 and 14: Sail Behavior in light, medium, and heavy breezes (videos I shot during last year's sail on Pilgrim)
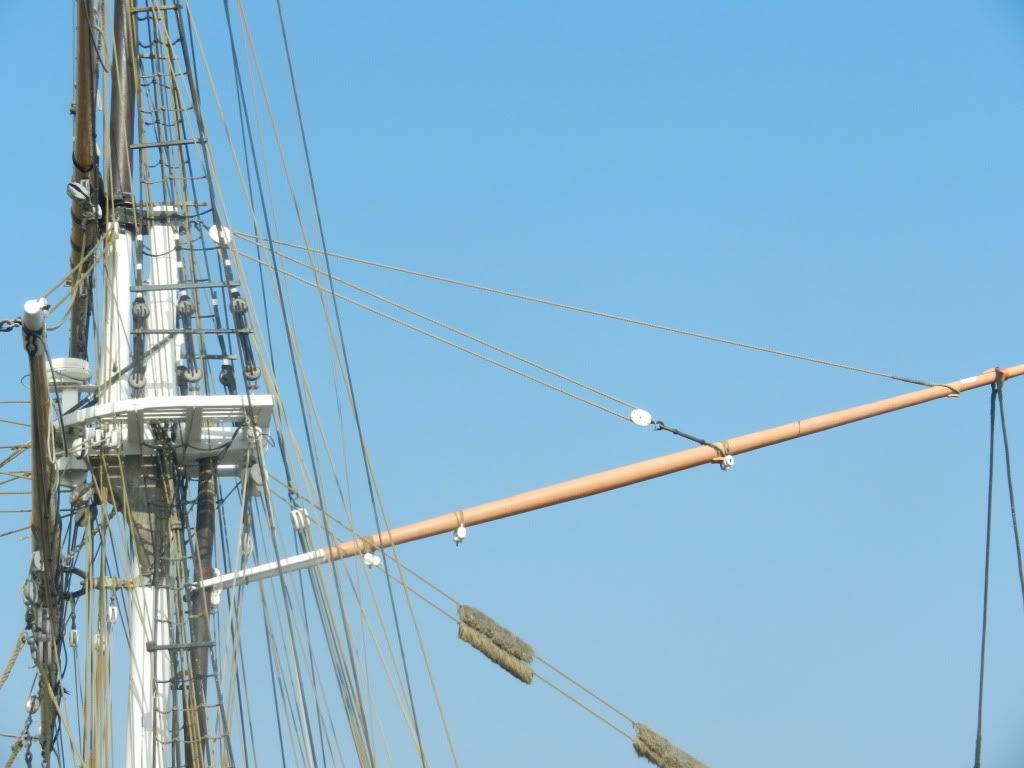
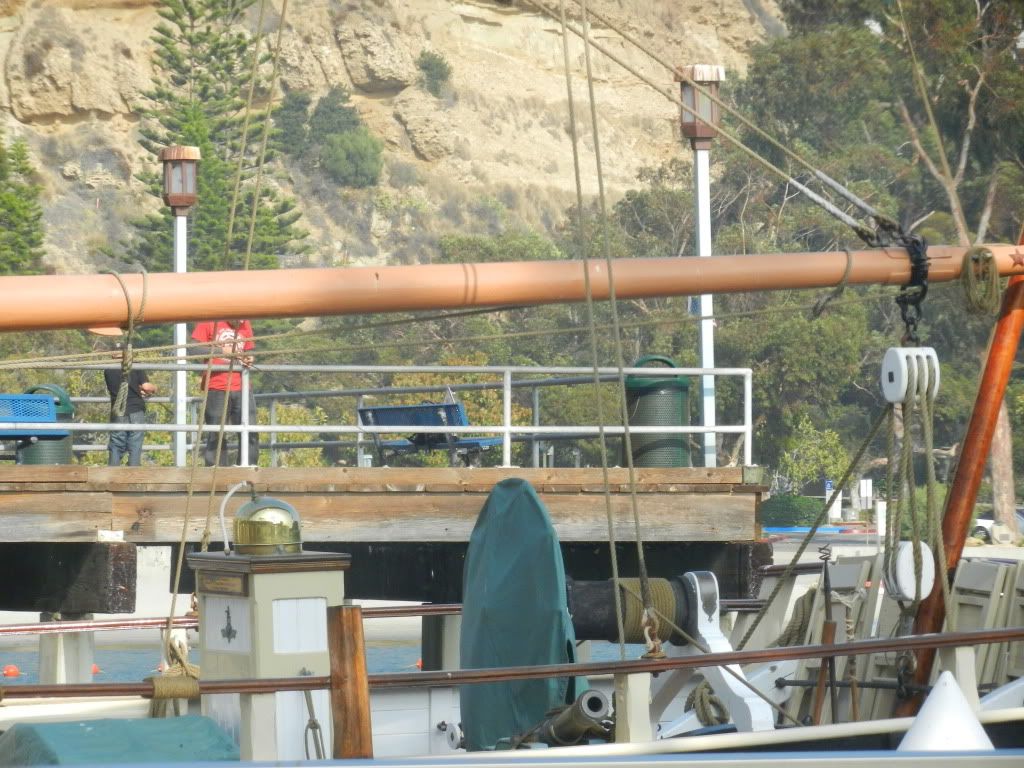
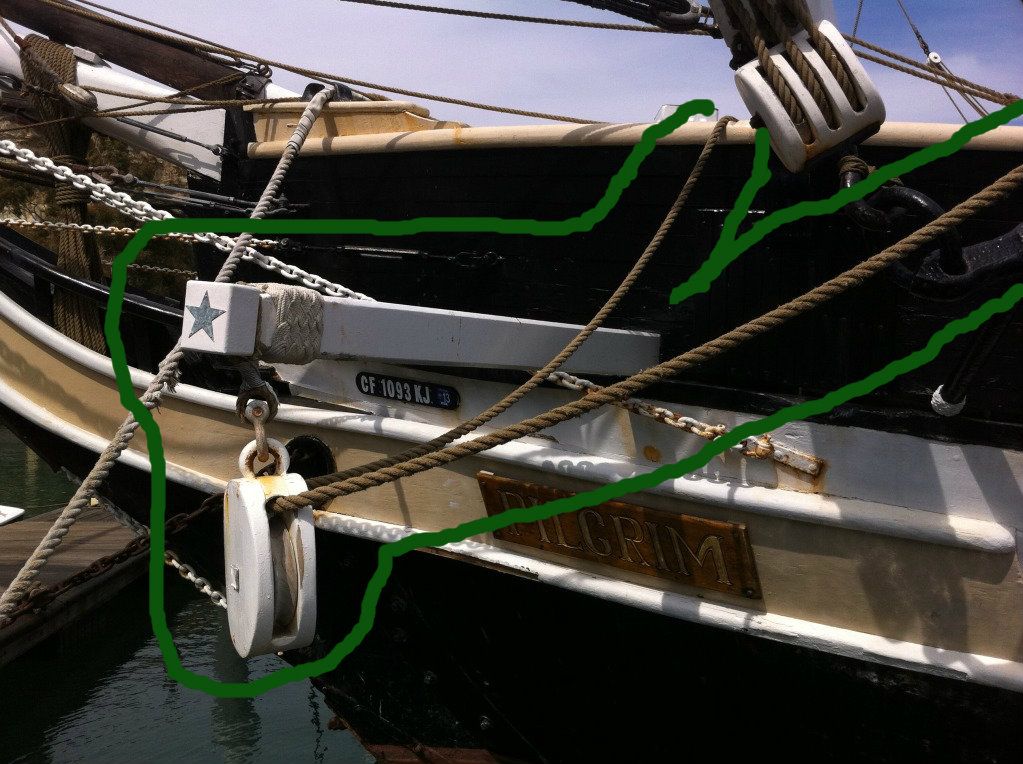
Post #20: Fores'l-Specific Rigging (including boomkins, or the "antenna things")
Post #26: Lifting and Depressing Sails
 
Rigging and Important Parts (Not to scale. To modelers: The rigging of the jibboom and bowsprit varied, so you'll have to do some research. This is not designed as a pattern to create your vessels from.)


Rigging001-1.jpg


1. Spanker Gaff
2. Spanker Boom
3. Stern Davits
4. Quarter Davits
5. Quarter Gallery
6. Main Channel (The mizzen and fore channels are not shown in the diagram, but are located in the same spot and serve the same function in relation to each mast respectively.)
7. Hammock Netting
8. Rudder
9. Mizzen Mast (the lower portion of the mizzen mast)
10. Mizzen Topmast
11. Mizzen Topgallant mast (pronounced t’gallantmast)
12. Mizzen Top (When referring to the tops nonspecifically, without the name of a mast, they are referred to in the singular and plural form as the tops.)
13. Mizzen Crosstrees (When referring to the crosstrees nonspecifically, without the name of a mast, they are referred to in the singular and plural form as the crosstrees.)
14. Mizzen Mast (the entire mast)
15. Main Mast
16. Fore Mast
17. Mizzen Stay
18. Mizzen Topmast Stay
19. Mizzen Topgallant Stay
20. Mizzen Royal Stay
21. Main Royal Backstay
22. Main Topgallant Backstay
23. Main Topmast Backstay
24. Main Backstay
25. Main Shrouds The shrouds are named as follows: lowest set: man shrouds middle set: main topmast shrouds top set: main topgallantmast shrouds. The main topgallantmast shrouds end right above the topgallant yard, and not above the royal.
26. Ratlines (pronounced ratlins)
27. Futtock Shrouds (There are also futtock shrouds under the main crosstrees, not labeled.)
28. Main Topmast Shrouds
29. Main Topgallantmast Shrouds
30. Mainstay
31. Main Topmast Stay
32. Main Topgallantmast Stay
33. Main Royal Stay
34. Fore Yard (an exception to the note following #37: the lowest yard down on the mizzen mast can be called the mizzen yard or the crossjack yard. Crossjack was pronounced "cro'jack" by seamen.)
35. Fore Topsail Yard (pronounced fore tops’l yard)
36. Fore Topgallant Yard (pronounced fore t’gallant yard or fore t’gants’l yard)
37. Fore Royal Yard
Numbers nine through thirty seven (excluding fourteen, fifteen, and sixteen) exist on all other masts, and are named in accordance to the mast they are on. (An example is the fore topmast.) They are not labeled on the diagram for all of the masts. Some are not shown on the diagram on all of the masts to avoid obscuring other items.
38. Forestay
39. Fore Topmast Stay
40. Inner Jib Stay
41. Outer Jib Stay
42. Fore Royal, or flying jib Stay
43. Bobstay
44. Martingale Stay
45. Spritsail Yard (pronounced sprits’l)
46. Dolphin Striker (aptly named)
47. Cathead
48. Bowsprit
49. Jib Boom (pronounced jiboom)
50. Fore Tops’l Studdingsail (pronounced stuns’l) Boom
51. Fore Studdingsail Boom
Stuns’ls were usually only used in light winds, and the booms would have been stowed on top of their corresponding yard without protruding from said yard. They could exist on all yards, on both port and starboard, but the most commonly used were the main and fore tops’l and t’gallant stuns’ls. Royal stuns’ls were so fragile that they could only be used in the faintest wind.
(they are usually set asymmetrically to avoid blocking the flow of the wind to the other masts)

Keep in mind that there are spaces between each mast segment, as shown in the following diagram made for Legendary Spider's Enterprise rerigging.

Brigspars001.jpg
 
Last edited:
Post Captain's Guide to Spankers, Spencers, and Trys'ls


Note that the following also applies to schooners, ketches, etc. For the sake of time, I won't go into anything that is tolerably accurate in the game, or would take too long to fix, such as furling. The Pilgrim is rigged like a snow brig (pronounced snou, with an ou like in ouch) so there are extra "masts," directly parallel to the "real" masts, that the gaff and the boom are attached to.
Gaff: the spar on top.
Boom: the bottom spar. If the sail is only rigged to a gaff, and does not have a boom (usually only the fores'ls on certain schooners) then the lifts, baggywrinkles, preventer, and sheet are nonexistent. See below for what the these baggywrinkles are.
DSCN1422.jpg

The line above and attached to the gaff is the peak halyard, which raises the tip of the gaff up or down. It has been run through several blocks. The rigging of this line generally followed the form shown, but with some variations. I would recommend looking at some images of other vessels as well as this one.
The lines running from the end of the gaff downwards are the gaff vangs, controlling the trim (port or starboard) of the gaff.
The lines with the fuzzy things attached (the fuzzy things are called baggywrinkles and act as chafe protection for the sail. see next.) are the spanker boom lifts, controlling the upwards or downwards elevation of the boom. they are necessary on any vessel with a boom. (at least from the time period we're interested in)
Baggywrinkles were always attached to the lifts to protect the sail.
The line attached furthest forward on the gaff is the throat halyard. It raises the "throat" or inside of the gaff up or down. On schooners, the gaff would be lowered down onto the boom to furl the sail using the peak and throat halyards. On brigs, ships, and the like, the sail was furled similar to how the sails are furled in the game.
DSCN1422.jpg

a detailed view of the throat halyard. It is only the one attached to the gaff along with its two blocks. (there are a lot of other lines there)
DSCN1426.jpg

the line attached to the end of the boom running downwards is the sheet, used to hold the boom inboard. the more it is loosed, the further outboard the boom goes.This was usually rigged to the end of the boom, no matter how far off the stern it protruded. It is possible on larger vessels to have two separate s and lines, but you would need to further research that on a case by case basis.
The loop hanging of the boom near the left of the frame is where the preventer would attach, which would pull the boom outboard. It was ideally rigged two thirds of the way out on the boom. It is not currently rigged on the Pilgrim, since the sail has been removed for the winter months. The line would be rigged to two blocks, similar to the throat halyard's set up but smaller. there was a hook at the end to allow it to be moved to either port or starboard, depending on the wind.
The lines attached to the boom moving diagonally to the right are the boom lifts, discussed earlier.
Untitled.jpg

the bottom three red circles indicate where the preventer could be attached to the deck by way of its hook. the starboard side has the same setup. It could also attach to a backstay to allow it to go further outboard, but these rings are more commonly used for regular sailing. The red circle on top is where the port gaff vang attaches.
DSCN0992-1.jpg

You can actually see the sheet here. The Spencer (like the spanker, but on the fore mast) is furled the same way the spanker is, regardless of its lack of a boom.
The tiny coil of line at the very end of the boom is the flag halyard, which is used to hoist the ensign.
DSCN1013.jpg

The sail is held to the mast by those wooden hoops, which are lashed to the sail with twine.
see http://s780.photobucket.com/albums/yy82/Alexander_Ah/Ships/ for more details if the link works.

I'm sure I've knocked at least a few of you unconscious with this convoluted explanation, so feel free to ask questions.
 
Sail Diagrams
sail is pronounced "s'l" in most cases, and is written that way in the diagrams. All sails, with a few exceptions, are named for the mast they are attached to. Stays'ls are named for the stays they are attached to, which are mostly named for the masts they are attached to. Included in these names is the specific part of the mast. (topmast, t'gallantmast, etc.)


Schooner:
Schooner001-1.jpg

1: Mains'l
2: Fores'l
3: Fore Stays'l
4: Jib
5: Ringtail, or Bonnet (only set in light favorable winds)
6: Main Gaff Tops'l (also known as the "jumbo")
7: Fisherman's Stays'l
8: Flying Jib


Sloop/Cutter: (The distinction between a sloop and a cutter back then was where their masts were located. A cutter's was closer to the center of the vessel while a sloop's was further forward. The sails share the same names.)
Sloop-Cutter001.jpg

1: Mains'l
2: Main Stays'l
3: Inner Jib
4: Outer Jib
5: Main Gaff Tops'l
6: Flying Jib
7:Ringtail or Bonnet (rarely set- only in light, favorable winds)


Ketch:
(can also be square rigged- Any two masted vessel with the aftermost mast being the shorter of the two is considered a ketch, unless the aftermost mast is located aft of the rudder. In that case it would be a yawl.)
Ketch001-1.jpg

1: Mains'l
2: Mizzens'l (the mizzenmast can also have a ringtail on it- see sloop)
3: Main Stays'l
4: Main Jib
5: Flying Jib
6: Mizzen Gaff Tops'l
7: Main Gaff Tops'l


Full-Rigged Ship:
Ship001-1.jpg

1: Fores'l (or fore course)
2: Fore Tops'l
3: Fore Topgallant (pronounced "t'gallant" or "t'gants'l." From Now on I will call the topgallants "t'gallants.")
4: Fore Royal
5: Mains'l (or main course) (It was not set with a breeze coming from further back than a quarter off the stern, since it would block the flow of air to the fores'l, which was generally more useful than the mains'l)
6: Main Tops'l
7: Main T'gallant
8: Main Royal
9: Spanker or mizzens'l or driver (formally called the mizzen trys'l) (spanker is the most common term)
10: Mizzen Tops'l
11: Mizzen T'gallant
12: Mizzen Royal
13: Ringtail, or Bonnet (very rarely set, or even present, on a ship or brig)
14: Mizzen Stays'l
15: Mizzen Topmast Stays'l
16: Mizzen Topgallant Stays'l (exceedingly rare)
17: Mainstays'l
18: Main Topmast Stays'l
19: Middle Stays'l (exceedingly rare)
20: Main T'gallant Stays'l (common, but only useful under certain circumstances)
21: Fore Stays'l (only found on men of war and possibly one out of every two hundred East Indianmen) (not set very often, but more common than the mizzen t'gallant stays'l and ringtail)
22: Fore Topmast Stays'l
23: Inner Jib
24: Outer Jib
25: Flying Jib (could only be set in a light breeze)
21-25: Collectively referred to as heads'ls.
26: Sprits'l (became rare during the mid 1800's)
27: Sprit Tops'l (became rare after the late 1700's, and exceedingly rare after the Napoleonic period)
28: Not Labeled or Shown- Crossjack: A squares'l suspended under the mizzen tops'l, a mizzen course, in effect, although proportionately smaller than the fore and main courses. (sometimes pronounced "cro'jack") (almost unheard of for full rigged ships in the game's time period, and very rare later on)


The first three vessels could also carry square tops'ls, t'gallants, and royals, as long as the configuration of the masts was kept the same. Not all vessels set all of the sails shown (I tried to show everything that would have been set).

Feel free to make requests for diagrams of any other type of rig. I'm going to use my own diagrams because the ones online do not fit into the game's time period.
 
Reserved for Line Diagrams and Definitions


(square sails, yards, gaff and boom, lateen sails, trapezoidal sails, and misc.)
 
I think it should be mentioned that the system for naming the sails is based on their respective mastpiece. That includes the headsails. I did manage to get a few bits and pieces of knowledge from this, i must say. I'd also like to note that the mizzen only has a mastpiece behind the actual mizzen when both a gaff and mizzen course (or crossjack, which would be the proper name for he mizzen course if a gaff is also present) are rigged onto the mizzen, unless you'd correct me on that.
 
I'd also like to note that the mizzen only has a mastpiece behind the actual mizzen when both a gaff and mizzen course (or crossjack, which would be the proper name for he mizzen course if a gaff is also present) are rigged onto the mizzen, unless you'd correct me on that.

I'm not quite sure what you're getting at there, But I definitely agree that I should have pointed the mast nomenclature system out. I chose to exclude the crossjack because it's such a uncommon sail, and almost never seen on vessels concerned with the game.
 
I added a little thing about the masts and crossjack. Did you men a trys'l mast, like on a snow brig? That shouldn't be on any vessel except a snow brig. I'll add that sail plan later and make that more clear.
Thanks for pointing that out, by the way. If any of you see something unclear or missing, feel free to point it out.
 
well, at the moment it seems i misinterpreted the photographs a bit. Behind the mizzen, there's a length of wood or iron that holds the wooden hoops for the gaff. I assumed it was a trysail mast, but there's no crossjack, and such masts are usually of the mizzen's thickness. Or mainmast, as it would be on a snow.
 
I think I know what you're talking about... They are indeed trys'l masts, but I've never seen those on anything but snow brigs. The pictures were all of a snow brig, Pilgrim.
They were almost always wood, and most of the ones I've seen are smaller in diameter than their respective masts. You don't necessarily need to have a crossjack to have a trys'l mast. In most vessels, the hoops just go directly to the masts.
 
then what's the engineering logic behind having such a mast? outdated technology, or just room for the spars?
 
It's basically just more room for spars. If you have a trys'l mast, your trys'ls can be tacked off at a greater angle form the center of the vessel. It's also a bit more added strength.
 
Proper Sail Behavior, for the hell of it:


When becalmed, or when there is a breeze of only a few knots, the sails billow against the roll of the vessel. This can be quite violent and loud at times, but will generally keep the vessel moving at one or two knots:

When there is a medium breeze, sails billow out moderately with the wind:
 
(sail behavior, continued)

The sails billow out more severely as the breeze grows stronger:
 
I'm going to be making running rigging diagrams sometime soon. There's absolutely no way I can cover an entire vessel in one diagram, so I'll start wherever you guys want me to.
 
What gives me the most trouble is gaff and topsail rigging. Someday I hope to get the Hooker rigged correctly.
 
I think the diagram will have to be delayed until next week, but I will eventually start with a tops'l and a gaff diagram.
 
Wow. I definitely learned a lot more than I already knew. Nice work! It's good to have someone on the modding team that does this in real life! :onya

Maybe I'll see you when I go to the tallship festival in September.
 
Thanks. It's very possible that you'll run into me, depending on my tour schedule, which will be determined a few days before the festival.
 
Fores'l-Specific Rigging
-----------------------------------------------------------------------------------------------------------------------------------------------------
I decided to make the tacks and sheets the square fores'l the next subject in my guide due to some confusion that has been expressed on their positioning.

IMG_1021.jpg


As you can see above, there are a variety of lines attached to the clew (bottom corner) of a square fores'l. Two of these lines run directly downwards, eventually ending up on a pin or cleat on deck. The Tack runs forward, and the sheet runs aft. Both lines are used to hold the bottom corner of the sail down, and transfer some of the energy provided by the sail to the hull of the vessel.

IMG_1018-1.jpg


The tack is outlined in green, and the sheet is outlined in red. in yellow, the future of naval combat.
Keep in mind that the sail is furled, so the tack and sheet are much higher up than they would be with the sail set.

IMG_1017-1.jpg


Here you can see that the sheet runs through the bulwarks and onto a pin on the pinrail. The height of this opening varies from vessel to vessel, so modelers should try to find running rigging diagrams of vessels they are creating. In some frigates, the opening may have been somewhere on the level of the gun deck.

IMG_1016.jpg


More detail on the sheet.

IMG_1015.jpg


Where the sheet eventually ends up. In the upper right corner, you can see an authentic 1835 water bottle replica belonging to a summer camp director.

IMG_1020-1.jpg


Here you can see hoe the tack is run through a block suspended from the boomkin. (Boomkins are cylindrical on some vessels) This allows the tack to spread the sail out further than it would be able to go if the tack were made directly to the pinrail. Placement of the boomkins varied, but the tack would always eventually end up on a pin or a cleat on deck. No other rigging was attached to the boomkins.
 
Back
Top