• New Horizons on Maelstrom
    Maelstrom New Horizons


    Visit our website www.piratehorizons.com to quickly find download links for the newest versions of our New Horizons mods Beyond New Horizons and Maelstrom New Horizons!

Released The Marianna

Hello,

I back this thread to make a request to a modeler experienced.

I wish I learn how to modify the models of PotC in order to be able to turn my ship. To make it more personal and a simple retexture of "FastGalleon".

Here is the list of things I'd like to do, tell me if this is possible and how to do it:

1) To begin, I would like to repair locators missing two guns. As you can see, in fact the ship is supposed to have 38 guns and not 36 as stated in the mod files.
gmview2012083022395269.png
Locators are missing guns surrounded.
2) I wish I add new guns.
gmview2012083022385269.png
I want to add small cannon surrounded places.
3) Time to details. I want to erase the original rudder to put more realistic.

gmview2012083022355269.png
The rudder that I want to install.
4) I'd like to know if it would be possible to copy a part of the vessel and paste it to another location or even remove it?
gmview2012083022265982.png
I wish I have one of the two boards that support ropes to climb on top of the mats. The move to the third mat (the far right) and add strings for him there is no access to mount.
gmview2012083022264535.png
gmview2012083022270925.png
I would like to "create" the place where the squares to make cannons normal.
gmview2012083022281969.png
gmview2012083022325269.png
I would like to replace the "crow's nest" of origin by a classic. Such as that of the Black Pearl on the second image.
gmview2012083022465336.png
gmview2012083022505336.png

I wish I replace the lamps as also those of the 2nd image for example.
gmview2012083022565336.png
And add other small details like a boat, crates, barrels and bags.

That's all I want to do this and I do not know where to start or what is feasible or not. I hope someone can help me and teach me.

Thank you in advance, cordially.

Ps: I'm french and I understand little English, it was possible to illustrate the explanation that I would be a great help.
 
Well, you'll be pleased to know that all your suggestions are possible. :onya
I've worked on that model before, but the results never made it into the mod, probably because of a locator issue. Here's what I did to it:
FastGalleon_upgrade1.jpg

It now has a lifeboat on deck, and a couple of other details have been replaced. I also removed the ship's wheel, because they hadn't been invented when these ships were around.
Instead, it would have a tiller somewhere below the deck.
So, I might be able to help you learn how to modify the ship. :)
Firstly though, do you have any 3D modelling programs (like Maya or 3DS Max)? If not, you can get Maya 5.0 from our Downloads section here.
You can do almost anything to the model with that program. It's even possible to replace all the ship's guns with betters ones, like those on the Black Pearl model.

By the way, replacing the crow's nests is a good idea, but it would be better to use more accurate ones instead of the Black Pearl's more modern versions.
A crow's nest was common on galleons like yours, so it's worth keeping to realism.
 
Beautiful, I can not wait to learn!xD

However, I have no program for 3D modeling. Which of the two you advise me?

For the provision of the bridge (capstan and boat) that you have done on your own model. I had thought to do the same, except for the rudder that I want to keep.

For the "crow's nest", you're right. I do not change my original one is finally well.
 
I recommend Maya 5.0, because I'm not familiar with 3DS Max. See the link below:
you can get Maya 5.0 from our Downloads section here.

The boat and capstan are actually standard models that I took from other ships. There is no need to make new ones.
For the steering wheel (not "rudder"), there is a better version you could use like the one on the improved corvette:
corvettev2_qdeck-jpg.7295
 
Excuse me for the double post.

I installed Maya, but I can not open the models of POTC.

And I would like to start by repairing missing two locators on the guns.

Thank you in advance.
 
The plug-in is only required for exporting the model from Maya back to GM format.
Maya can't read the game's GM files, so they have to be imported in OBJ format using GM Viewer.

However, I can give you a head start with the Maya file of the FastGalleon I worked on before: see this link and click 'FastGalleon1.zip'.
For now you can have a look at the model and familiarise yourself with the interface; I'll give you some more help later.

Unfortunately, there is a problem with the locators. The program we use to edit them will not open the model, which is a common bug with some ships. :facepalm
There is a workaround we could use, but eventually we'll need the entire set of locators anyway, so there's no point. I'll need to contact someone who can open the corrupted file.
 
Thank you very much Armada kindly spend time to help me.:bow

Your "FastGalleon1.zip" is corrupted. I can not extract the files with Winrar.
 
Oh, that's strange. :unsure OK, try again with 'FastGalleon1.7z' in the same folder (you might need 7zip to open it).
 
Ah yes, finally, I did not say it works.:onya

The ship has no texture when I open it. What should I do to him?

My question may seem silly. How do I manipulate the model to view for free?:oops:
 
To view the textures, you'll need to use TX Converter (available from our Downloads section here) to convert some of the game's TGA.TX files into normal TGA files.
Then, open the 'Hypershade' window and follow these steps (see image below):
1) Select one of the materials
2) Open the Attribute Editor, if it isn't already open
3) Click the icon next to 'color' in the Attribute Editor
Maya_image1.jpg
Next, follow these steps to assign the textures (see image below):
1) Browse to the folder containing the TGA files you converted
2) Click 'Reload File Texture'
Maya_image2.jpg
The materials need the following textures:
Capstan1_blinn1 -> dktM.tga
Lifeboat_blinn1 -> baat.tga
Blinn1 -> fightdeck2.tga
Blinn2 -> GhosttheMarianna.tga
Blinn3 -> Kapitan.tga
Blinn4 -> chear1c.tga

Once all the textures are assigned, press the [6] key to view the ship with the textures. You can also press [5] to view it without textures, and [4] to view the wireframe.

By "manipulate the model to view for free", do you mean how to move the camera around the ship?
Hold down the [Alt] key and use the left mouse button to rotate the camera; use the right mouse button to zoom in/out, and use the middle mouse button to move the camera's centre of rotation.
I hope that helps. :doff

Thank you!:onya

I want to know other manipulations:

How have the entire model? (Masts, ropes and lamps)

How do I add objects? For example, the wheel of the Corvette that you had shown in a previous message.

How do I select a particular object? For example I want to select only the bridge and grilles in place more somewhere else on the bridge. However, when I click on it I select the entire model.
 
First things first, there's an updated Maya file that you'll need. Please download 'FastGalleon1_Maya.7z' from my SkyDrive folder.
I'll also give you the Corvette's wheel in a separate file later.

The ropes are added using locators, so they can only be seen in the game.

Anyway, to import the masts, yards, lamps etc, you firstly need to open each model in GM Viewer and select 'OBJ Export' (bottom left). Save the files somewhere suitable.
Then, you can import the OBJ files into your Maya scene. Here are some extracts of an explanation I wrote in another thread:
You are now ready to import an OBJ file into the scene. Go to File->Import..., navigate to the file's location, and click 'Import'.
...
Continuing on from Step 1, select one of the components of the model in your scene.
On the right-hand side of the screen, you'll see some tabs appear. The one labelled '[object name]Shape' is open by default.
Under this tab, select the arrow next to 'Render Stats', and you'll see several tick boxes next to some attributes.
Imported OBJ files always begin with all render stats ticked except for 'Visible in Reflections', 'Visible in Refractions' and 'Opposite'.
As a general rule, you must ALWAYS, for EVERY component, tick EVERY box EXCEPT for 'Double Sided' and 'Opposite'.
[note: this doesn't include anything below the line under 'Opposite'; leave those unticked]

Now, you'll notice the model looks black again, and this time it's inside-out. Don't panic, this is supposed to happen! :p
With a component still selected, select 'Edit Polygons' at the top of the screen, and go to 'Normals -> Reverse'.
Then, go to 'Edit Polygons -> Normals' and select the box next to 'Set Vertex Normal'.
Make sure 'Lock Normals' is unticked and 'Unlock Normals' is ticked, then select 'Normalize Normal' and click 'Set Normal'.
You should now see the model displayed correctly, but in most cases the edges are jagged at this stage.
To fix this, go to 'Edit Polygons -> Normals' and click the box next to 'Soften/Harden'. Change the angle to 90 degrees, and click 'Soft/Hard'.
The model should now look much smoother than before.

[note1: if the model looks no different after the 'Soften/Harden' phase, then you probably need to merge the model's vertices.
Go to 'Edit Polygons -> Merge Vertices', and repeat 'Soften/Harden'.]
[note2: for both 'Set Vertex Normal' and 'Soften/Harden', the settings only need to be defined once. From then on, you can simply click the text button instead of the box next to it.]
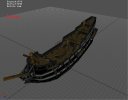
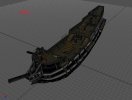
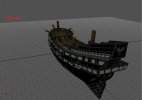
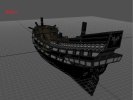
All imported models will need to have materials assigned to show their textures.
The masts can use the existing material 'Capstan1_blinn1'. Select the masts, and in the Hypershade window, right-click on 'Capstan1_blinn1' and drag the mouse cursor to 'Assign Material To Selection'.
For the lamps, you'll need to add another material. First, use TX Converter to get 'fonar_day.tga.tx' into TGA format.
In Hypershade, go to 'Create -> Materials -> Blinn'. Then, in the Attribute Editor, click the icon next to 'Color', and in new window that appears, click 'File' under '2D Textures'. Now, click the folder icon in the Attribute Editor to browse to 'fonar_day.tga'. Finally, assign the material to the lamps, in the same way as the masts.

To select a specific part of a model, try this:
1) Select the entire model and press [F8]
2) Right-click on the model and drag the cursor down to 'Face'
3) Hold the [Shift] key and select each face of the part you want (by clicking on the small blue squares)
4) You can now manipulate that part using the Transformation tools (Move, Rotate, Scale), but you CANNOT copy and paste it.
5) When you're done, press [F8] again.

I know that's a lot of text to understand, so if you're confused, let me know. ;)
 
Hello,

Excuse me for my long absence. I've been pretty busy with projects, but now I am available to take my initiation.

Thank you for the explanation in your last post. :)

I saw the team working on the FastGalleon awhile. If you have completed the upgrade. Please, I would like to have a version of this ship, but always with the figure of the dragon at the bow. This is in particular detail that charmed me.

I want you also send me the wheel of the Corvette so I can put it back on again the FastGalleon.

A question that has nothing to do with my initiation. Ruffles appeared on ships from which year exactly? I searched but I found nothing ...

Thank you in advance.

cordially
 
Good to see you back. :cheers

I've uploaded the latest FastGalleon Maya file, along with the Corvette's wheel, here: FastGalleon1_Maya.7z and Wheel1+helm.7z

Sorry, but I'm not quite sure what you mean by 'ruffles'. Could you explain what you meant?
 
:ahoy

The mod that Armada has built has 2 bows. One with the critter and one without, so we are both happy. :cheers

I am working on improving the sails and rigging and will finish soon. There is still much to do. There will be some changes to locators on the hull as some are moved, added, and deleted.
 
Hello,

I'm back after a long absence. I'm sorry my fake back last time, but I had a few problems.

This time, I do not return empty-handed. I adapted the Marianna with the new model FastGalleon.

https://www.dropbox.com/s/pz309rw8grkitkp/Marianna File.zip

You will see on the pictures below, the changes that have been made.

I have three new projects that I would like to achieve. I will tell more when it starts to take shape.

A soon!
 

Attachments

  • Before Marianna 1.jpg
    Before Marianna 1.jpg
    233.7 KB · Views: 241
  • After Marianna 1.jpg
    After Marianna 1.jpg
    204.7 KB · Views: 258
  • Before Marianna 2.jpg
    Before Marianna 2.jpg
    179.6 KB · Views: 243
  • After Marianna 2.jpg
    After Marianna 2.jpg
    143.8 KB · Views: 266
Back
Top