-


Visit our website www.piratehorizons.com to quickly find download links for the newest versions of our New Horizons mods Beyond New Horizons and Maelstrom New Horizons!-
Join our discord server for regular podcasts/AMA about upcoming and released pirate games (Caribbean Legend, Corsairs Legacy, Ahoy, ERAS 2, etc.):

-
Quick links for Beyond New Horizons
- Download latest version
- Wiki - FAQ - Report bugs here - Bug Tracker on Github -

Quick links for Maelstrom
- Download the latest version of Maelstrom
- Download the latest version of ERAS II - Download the latest version of New Horizons on Maelstrom
-
Join PiratesAhoy! on our social channels:


-

Quick links for PotC: New Horizons
- Download latest version
- Wiki - FAQ - Report bugs here
-

Thanks to YOUR votes, GOG.com now sells:
- Sea Dogs - Sea Dogs: Caribbean Tales
- Sea Dogs: City of Abandoned Ships
Vote now to add Pirates of the Caribbean to the list! -

Quick links for AoP2: Gentlemen of Fortune 2
- Downloads and info
- ModDB Profile
- Forums Archive -

A Pirate Podcast with Interviews
Music, Comedy and all things Pirate!
- Episode Guide - About - Subscribe -
- Twitter - Facebook - iTunes - Android -
- Youtube - Fill the Coffers -
You are using an out of date browser. It may not display this or other websites correctly.
You should upgrade or use an alternative browser.Tutorial Storm Engine Moddeling Basics
- Thread starter superdurnius
- Start date
 Could a new installer be made for Maya 5? There is no option as to where to install Maya 5 with the current installer, and that has been my problem for a long time.
It installs Maya 5 to program files only and that is why it would not install on my system. Today I shut down all of my security stuff and it did finally install.
I then moved it outta there and it still seems to work.") ) But it would have been nice to get it right the first time.
) But it would have been nice to get it right the first time. That's odd; it installed just fine on my Vista PC, to Program Files as usual. Why should Win7 be so different? :?
Anyway, I doubt anyone could make a new installer, unless they really know what they're doing.
What are you hoping to do now that you have a working Maya, out of interest?
The DEP stuff is mostly what blocked Maya from installing fully. I am politically active and have been under hack attacks off and on for over six years now, so there are a lot of security goodies installed too. I haven't gotten around to installing the plugins yet, so don't really know if it works or not.
What will I do when I getaroundtoit? Flagpoles, and reverse lighting bugs.)
How does one convert GM files to OBJ files? I have heard that it is done in TOOL but have not been able to find out how. Open the model in GM Viewer and select 'OBJ Export' (bottom left). Be aware that this ONLY works successfully for models which have fewer than 50,000 polys.
If a model has more than 50,000, you must make at least two copies of it, and then open one copy in TOOL.
Use the 'Edit Scene' function to remove one or more components until you think the model is below the 50,000 limit, and then remove all the other components from the second copy.
That way, you should hopefully have two files that make up the model, each less than the limit.
(BTW, in Edit Scene, you can make a note of the model's XYZ position, so you can move it to the same position in Maya.)
I'll go into more detail where appropriate when I finish the quick tutorial I'm working on.
Apologies it has been delayed; busy few days at college, so I've had less time for PA.
Ha! That worked. I now have rey_c3 in Maya 5. :mi Nowhere did I see anything saying to use GMViewer.
Now to explore Maya 5. :
:
Your other comments are for fixing the flagpole and it will be a while before I get that far. First comes La Licorne, then the other East Indiaman, then the Mordaunt.
There is no rush.
Oh, bugger!
I had almost finished posting the first part of the tutorial for you, when I went to type a capital 'r' using [Shift]+[r], but instead pressed [Ctrl]+[r].
Refreshed the page and lost all the text. Not the first time that's happened.
Ah well, time to start over. This time I'll use Notepad so I can't lose anything. Right, here's Step 1 of 'Fixing Models in Maya 5.0'. For real, this time.
First things first, you'll need to set up your scene correctly. A scene is just another word for the file you're working on.
Open Maya and you'll be given a new blank scene (Untitled). In the space under 'File' and 'Edit', check the drop-down menu is set to 'Modeling'.
This essential to have the relevant menu items along the toolbar.
Next, you'll need to choose the correct working units for the scene.
Go to Window->Settings/Preferences->Preferences... In the pop-up window, choose 'Settings' in the 'Categories' section.
Under Working Units, change 'centimeter' to 'meter', and click 'Save'.
Any OBJ files imported from GM Viewer will now be the same scale as they are in-game.
After changing from centimetres to metres, the scene is now 100 times bigger, so the camera settings need to be adjusted to compensate for this.
In the top left corner of the scene window, click View->Camera Attribute Editor...
The camera's settings will appear on the right of the screen. In that box, increase the Near Clip and Far Clip Plane values by a factor of 100.
At this point, you're ready to zoom out to get a better view of the enlarged scene.
Hold down [Alt] and your Right Mouse Button (RMB), and drag the mouse either upwards or to the left of the screen to zoom the camera out.
Once you can see the whole grid again, release both buttons. This is one of a few examples of navigating the scene in Maya.
Other useful examples include: [Alt]+Left Mouse Button (LMB)+drag to rotate the camera around the scene,
and [Alt]+Middle Mouse Button (MMB)+drag to move the camera's centre of rotation.
OPTIONAL: you can adjust the Heads Up Display (HUD) of the scene to your liking, in the Display->Heads Up Display menu.
Some useful options you might want to use include Poly Count and Origin Axis.
You are now ready to import an OBJ file into the scene. Go to File->Import..., navigate to the file's location, and click 'Import'.
The model will appear in Wireframe view; to view it with 'Smooth Shading', press [5]. To change back to Wireframe view, press [4].
When viewed with Smooth Shading, the model initially looks completely black. To fix this, select Lighting->Two Sided Lighting.
At this point, save the scene. Go to File->Save Scene As..., choose a destination and filename, and click 'Save'.
Maya will not save OBJ files, which is why you must use 'Save Scene As', to save it as a Maya Binary (.mb) file instead.
Right, I think that's everything covered up to this point. Is the tutorial easy to follow so far?
I'll move on to adjusting the Render Stats once you're happy with this first stage.") Thanks. I've started messing with this and found one thing already.
Thanks. I've started messing with this and found one thing already.
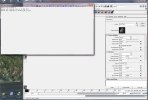
"The camera's settings will appear on the right of the screen. In that box, increase the Near Clip and Far Clip Plane values by a factor of 100."
You neglected to mention that one needs to click on "copy tab" to bring up the camera menu. It is called "perspective" or something. After I found those values and changed them the "copy tab" box is grayed out and I can't go back to see if my changes are correct or change them if they are wrong.
The only thing in my current game that needs changing are some hulls. I'm sailing a Spanish War Galleon. One has the "model could not be read" issue, and the other one beeps and has a bad bow wave. Would these be good things for a noob to mess with?
Huh? I've never had to click 'Copy Tab' to view the camera attributes.
They should appear automatically in the same window, as per this screenie:

I don't see why nothing should appear at all. Anyway, you will know that your changes took effect if you can zoom out to get a clear view of the scene, as in the screenie above.
As for the Spanish War Galleons, those are based on the stock game Galeon1 and 2, right? They would definitely be a good place to start.
Some stock ships convert to OBJ with the hull and deck as one component, which is very inconvenient, because you then need to separate the two.
However, I just checked Galeon1, and fortunately it converts as two components, so it's a nice easy one to work with.
It can also be edited in TOOL, which is essential for giving the fixed model the correct locators.
Galeon 2, however, does not work in TOOL, but you should be able to get away with modifying Galeon1's locators for it.
The beep problem can definitely be fixed, but I can't guarantee that you can fix the bad bow wave.
I'm still not sure about that, ever since attempting to fix the FastGalleon bow wave without success.
This time that file showed up. It takes many mouse clicks to get things to appear for some reason. What is that file that pops up in the background? Should I be concerned?
Ok, I'm working with Galleon 50 and GalleonWar. GalleonWar has been copied as an .obj file and is in Maya. It is also saved as an .mb file.
Now to go play some more. :j2Attachments
The 'Output Window' is always open; it's perfectly normal and doesn't affect your work. Not entirely sure what it's for, but that doesn't matter anyway. k
k
I'll start preparing the next part of the tutorial, to cover the render stats, normals, and positioning.
OK, after a rather long wait, here's Step 2: Render Stats, Normals and Positioning.
Continuing on from Step 1, select one of the components of the model in your scene.
On the right-hand side of the screen, you'll see some tabs appear. The one labelled '[object name]Shape' is open by default.
Under this tab, select the arrow next to 'Render Stats', and you'll see several tick boxes next to some attributes.
Imported OBJ files always begin with all render stats ticked except for 'Visible in Reflections', 'Visible in Refractions' and 'Opposite'.
As a general rule, you must ALWAYS, for EVERY component, tick EVERY box EXCEPT for 'Double Sided' and 'Opposite'.
[note: this doesn't include anything below the line under 'Opposite'; leave those unticked]
Now, you'll notice the model looks black again, and this time it's inside-out. Don't panic, this is supposed to happen!
With a component still selected, select 'Edit Polygons' at the top of the screen, and go to 'Normals -> Reverse'.
Then, go to 'Edit Polygons -> Normals' and select the box next to 'Set Vertex Normal'.
Make sure 'Lock Normals' is unticked and 'Unlock Normals' is ticked, then select 'Normalize Normal' and click 'Set Normal'.
You should now see the model displayed correctly, but in most cases the edges are jagged at this stage.
To fix this, go to 'Edit Polygons -> Normals' and click the box next to 'Soften/Harden'. Change the angle to 90 degrees, and click 'Soft/Hard'.
The model should now look much smoother than before.
[note1: if the model looks no different after the 'Soften/Harden' phase, then you probably need to merge the model's vertices.
Go to 'Edit Polygons -> Merge Vertices', and repeat 'Soften/Harden'.]
[note2: for both 'Set Vertex Normal' and 'Soften/Harden', the settings only need to be defined once. From then on, you can simply click the text button instead of the box next to it.]
This process will always eliminate the Reverse Lighting bug, you'll be pleased to hear.
Next, you need to position the model in the same place it was originally in GM format.
Here's where you'll need TOOL as a reference. Open the model in TOOL and go to 'Scene -> Edit Scene'.
Now, click on the model name next to the [+] sign, and you'll see some X, Y and Z coordinates appear in the section on the right.
Make a note of these, to three decimal places (Maya only works to 3 d.p.), and then close TOOL. [note: you can often ignore the X coordinate if it is almost zero]
Back in Maya, go to 'Window -> Hypergraph'. In the window that appears, click on 'group1', and you'll see its attributes appear on the right.
Under 'Transform Attributes', enter the coordinates from TOOL in the 'Translate' boxes, pressing [Enter] after each one. The model is now positioned correctly.
Save the file at this stage.
That's all for now, I reckon. Let me know if it makes sense before I move on to materials and the all-important GM export...
 Making whole islands? That is.... uhm.... a crazy amount of work. Are you sure you want to be doing that? I mean.... really sure?!?
 -